For most people, the Do Not Disturb feature on their iPhone (or iPad) is binary. It’s either off — and your phone is buzzing/beeping every time you get a call, iMessage, email or Tinder match — or it’s on, and nothing is bothering you while you sleep (save for Amber Alerts). The thing is, Do Not Disturb is actually a more sophisticated feature. You can program it so only certain people’s calls get through, or make it so you only get alerts when you’re actually using your iPhone (or iPad). Or you can schedule times for Do Not Disturb to turn off and on automatically. Here’s how.
And just a reminder: to access Do Not Disturb on your iOS device, swipe up from the bottom to access the Control Center and then tap the crescent moon icon. To edit your Do Not Disturb settings, open the Settings app and select Do Not Disturb.
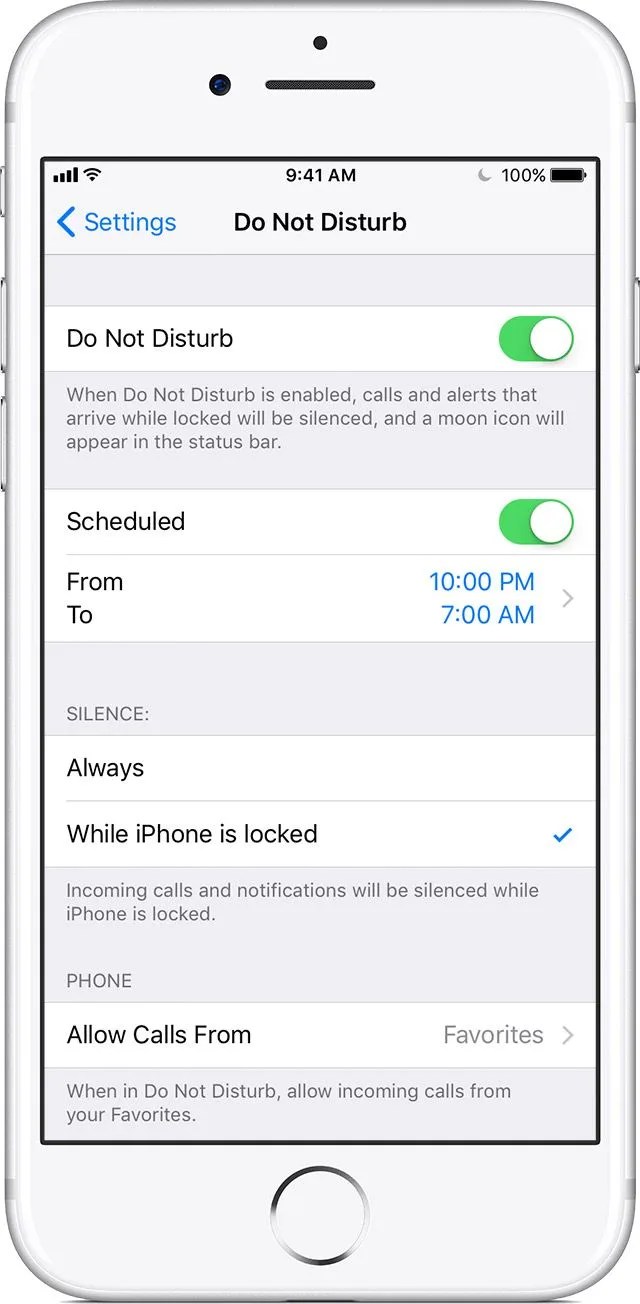
Schedule specific times for Do Not Disturb to kick in.
This can come in handy if you don’t want to have to remember to turn Do Not Disturb on and off. And it’s simple to set up. After selecting Do Not Disturb in your Settings app, you’ll see a “Scheduled” option — click it. From there you’ll be getting the option to set a specific start and end time for your quiet hours. Unfortunately, you can only schedule one block of quiet hours, so you can’t schedule Do Not Disturb to kick in from 7 p.m. – 8 p.m. and 10 p.m. – 6 a.m. Hopefully that’ll change with a future iOS update.
Allow calls and messages from specific people to get through.
Even in Do Not Disturb mode, you can still get notifications from people if you allow them. Select the “Allow Calls From” option and you’ll get to choose between allowing calls from either everyone, no one or the people who you’ve designated as your “favorites.” If you’ve never touched this feature, the default setting is to allow your favorite callers to go through.
Make Do Not Disturb turn on and off as you’re using your iOS device.
When you turn on Do Not Disturb, its default setting will block all notifications even if you’re using the phone. This can be a good thing if you’re trying to be productive, or an annoyance if you want to get notifications because you’re already using the device. To adjust this, go to the “Silence” section of Do Not Disturb’s settings. Here, you can pick between “always” and “while the iPhone [or iPad] is locked.” The first option is good if you want to prevent notifications or calls altogether. The latter will only allow them if you’re using the device, not if it’s locked by your bedside or in your pocket.