7 Settings to Change on Your Mac’s Menu Bar Right Now

Yes, you can customize the Menu Bar on your Mac to better fit your needs. Here’s how.

Mac Menu Bar tips and tricksPhoto by Tucker Bowe for Gear Patrol

Welcome to Product Support, a column devoted to helping you get the most out of the gadgets and software you already use.


Whether you’re a long-time Mac user or somebody acclimating to their first, there’s a good chance you’re not using the Menu Bar to its full potential. And thus, you’re making your life a lot more frustrating.

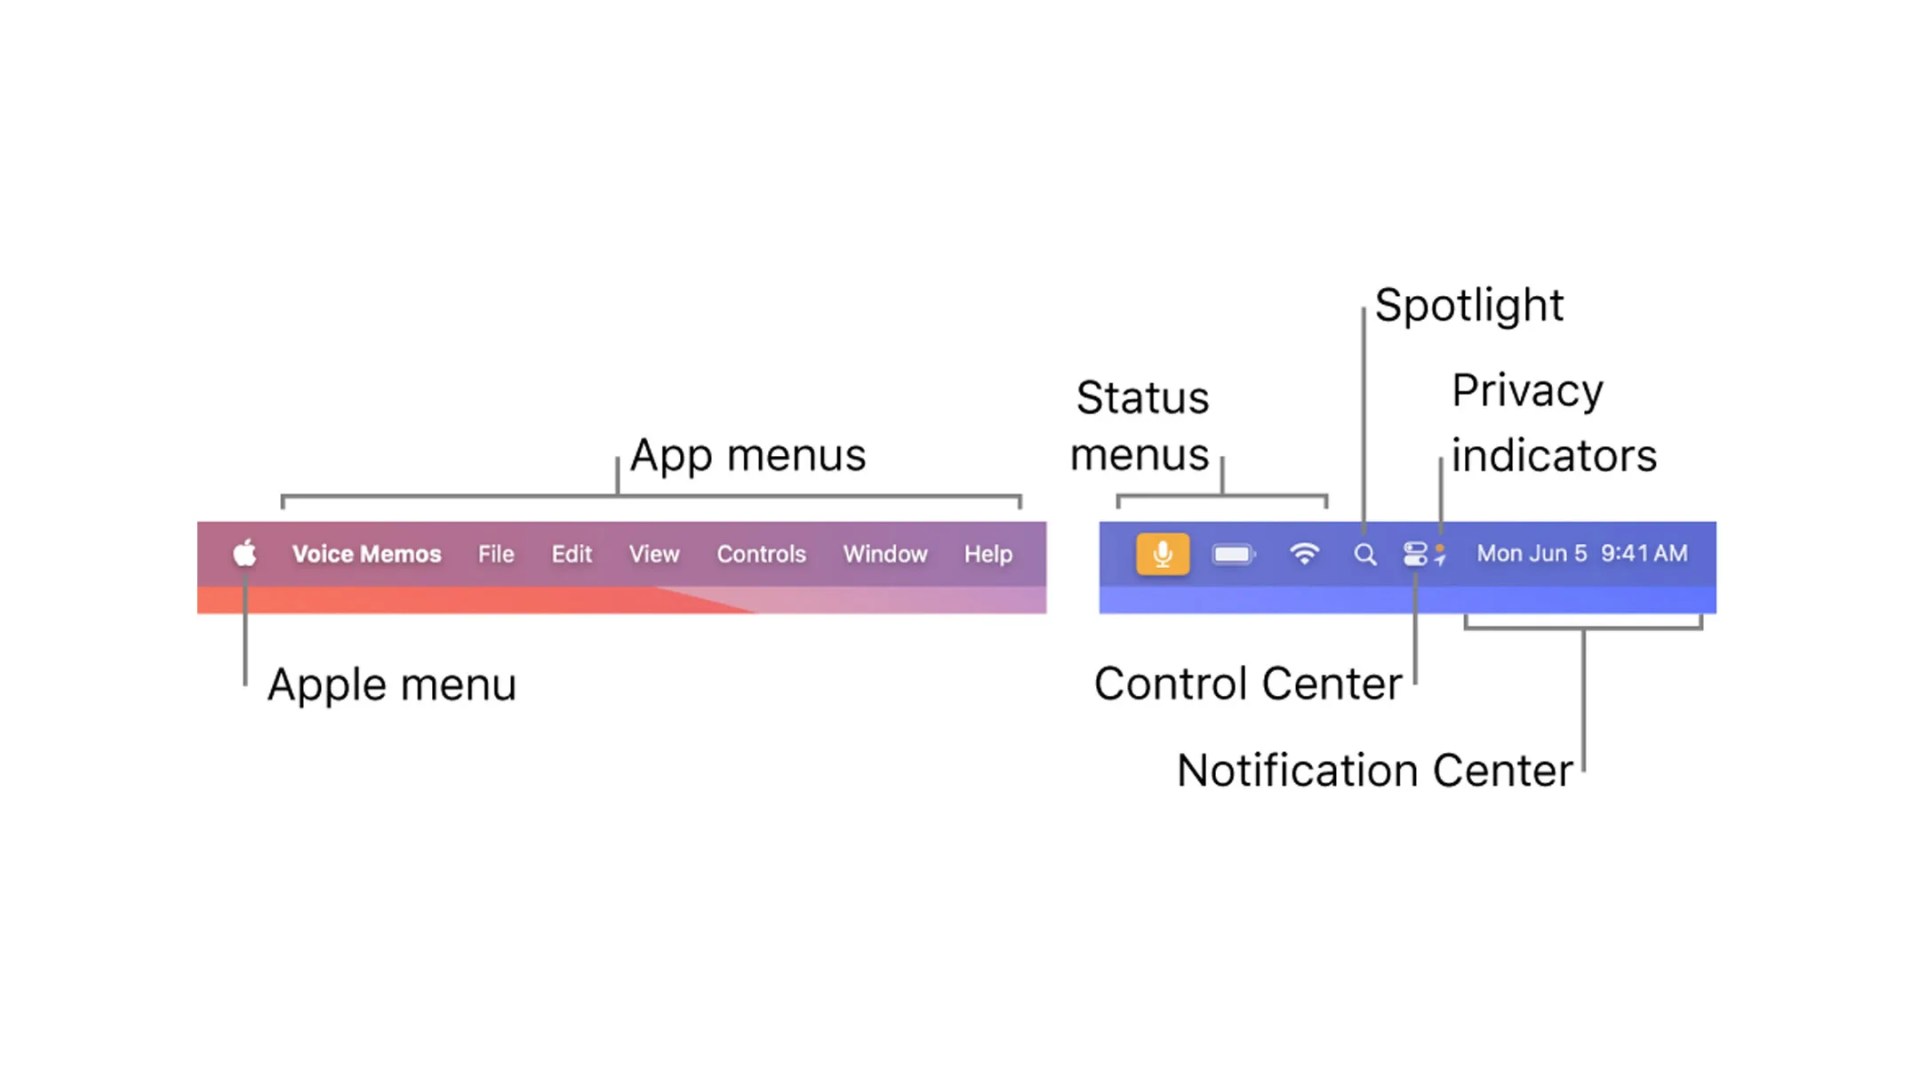
The Menu Bar is the area at the top of your Mac’s screen where all the menus — Apple, File, Edit, View, History and more — are located. The icons on the far right of the bar, called “status menus,” such as Wi-Fi and battery, are also part of the Menu Bar.

The thing to understand is that while the menus on the left side of the bar are pretty permanent, the status menus on the right side are infinitely more customizable. You can add, remove and rearrange basically all of them. And you’ll want to do just that because the more you use the Mac, the more crowded that part of the Menu Bar will likely get.

Mac Menu Bar from Apple's support page
An explainer of the Mac’s Menu Bar from Apple’s support page.
Apple

How to quickly delete status icons you don’t need

Every status menu can be removed except the Notification Center (the icon on the far right with the two-yin-yang horizontal stack). This includes the Wi-Fi, Bluetooth, battery, Siri and Spotlight menus, as well as any other that might appear. Here’s how:

  1. Press and hold down the Command key.
  2. Click-and-hold-down the status icon you want removed.
  3. Drag the status icon off the Menu Bar.
  4. Then unclick the status icon and it’ll disappear. You can now let go of the Command key, too.

How to rearrange status menus (icons) on the menu bar

The same Command key trick (as above) can be used to rearrange any status menu on the Menu Bar. You can move these icons either left or right. For example, if you want the battery menu icon to be as far left as possible, simply hold the Command key, click and hold the battery menu icon, and drag it left. Then unclick and it’ll there.

  1. Press and hold down the Command key.
  2. Click-and-hold-down the status icon you want moved.
  3. Drag the status icon either left or right on the Menu Bar.
  4. Then unclick the status icon stay put.

How to add some additional status menus to the menu bar

If for some reason a status menu that you want to appear on your Menu Bar isn’t there, you can populate it pretty quickly. Here’s how.

  1. Open System Settings.
  2. Select the Control Center.
  3. Find the icon you want added and select “Show in Menu Bar.”

Not every icon allows you to add it to the Menu Bar, granted, but this is an easy way to re-add the Bluetooth, Wi-Fi, volume or battery menu icons back to the Menu Bar.

How to make the Menu Bar disappear

The same way you can make your Mac’s Dock disappear, you can do this with the Menu Bar, too. Here’s how:

  1. Open System Settings.
  2. Select Control Center.
  3. Scroll down to the bottom until you see “Automatically hide and show the menu bar.”
  4. Select “Always.”

The advantage here is that you get more usable screen space because the Menu Bar isn’t there. You can still access the Menu Bar by hovering your cursor at the top of the screen, of course.

How to show the exact battery life on the Menu Bar

The battery icon is on the status menu by default, but it’s not that helpful. Sure, it shows you how full the battery is, but it’s small and not that exact. Fortunately, you can change it so you can see the exact percentage of battery life your Mac has. Here’s how:

  1. Open System Settings.
  2. Select Control Center.
  3. Scroll down to the Battery section.
  4. Make sure “Show in Menu Bar” and “Show Percentage” are both toggled on.

Note: If you’re noticing that your MacBook’s battery is depleting quickly, you can also select “Open Energy Saving Preferences” to see which programs are causing the drain.

How to change your clock from digital to analog

You can customize how your clock looks on your Menu Bar, too. Here’s how:

  1. Open System Settings.
  2. Select Control Center.
  3. Scroll down until you get to the “Menu Bar Only” section.
  4. Select the “Clock Options” button.
  5. You can toggle between digital to analog here.

You can also select whether you want the date and the day of the week to appear in the Menu Bar.

How to change the display of the day and date

The same way you can change the appearance of the Menu Bar’s clock, you can also change how the date looks. It’s the same steps as the above.

  1. Open System Settings.
  2. Select Control Center
  3. Scroll down until you get to the “Menu Bar Only” section.
  4. Select the “Clock Options” button

From the menu, you can select whether you want the date to appear in the Menu Bar — “Never” or “Always” — as well as if you want the day of the week to appear.

, , ,