Tailor-Made: Building a Bike From the Frame Up

For a long time our options for buying a bike were limited to what was at the local shop, which was a roll of the dice in terms of selection and service. But with e-commerce consumers have limitless information available at a mouse click.

tailor-made-building-a-bike-gear-patrol-lead-full A GP staffer sets out to craft his own ride. | HP

For a long time options for buying a bike were limited to what was at the local shop, which was a roll of the dice in terms of selection and service. In many ways, the manufacturer-distributor business model is antiquated and direct-to-consumer sales are the way forward. With e-commerce consumers have limitless information available at a mouse click. What does this mean for the bike buyer? You have options.

Purchasing a bike online used to be nigh impossible, but sites like Competitive Cyclist and Wrench Science are making it easy and worthwhile to get a high-quality ride off the web. However, if you’re in the market for a performance bike, it’s still expensive. Luckily e-commerce has also allowed for inclined customers to buy individual components. The wonders of a global marketplace also mean that in some instances you can buy components online from reputable European shops for less than your local bike shop can get them wholesale.

This availability opens the door for a bike purchasing option that didn’t really exist until the last 10 years: riders can now build their bike piecemeal, purchasing each individual component either new from online retailers or used from auction sites and classifieds. The result is a bike that can be built entirely outside of the bike shop system and that can be tailor-made to fit your specific wants and needs. That’s a recipe for high quality at low cost — so long as you know what you’re looking for.

With the experience of working in a bike shop under my belt and a good idea of what type of bike I wanted, I decided to try the “internet bike build” myself. With a budget of $2,000 I set out to best some of the similarly priced complete bikes for sale at the local shop.

Step 1: The Frame

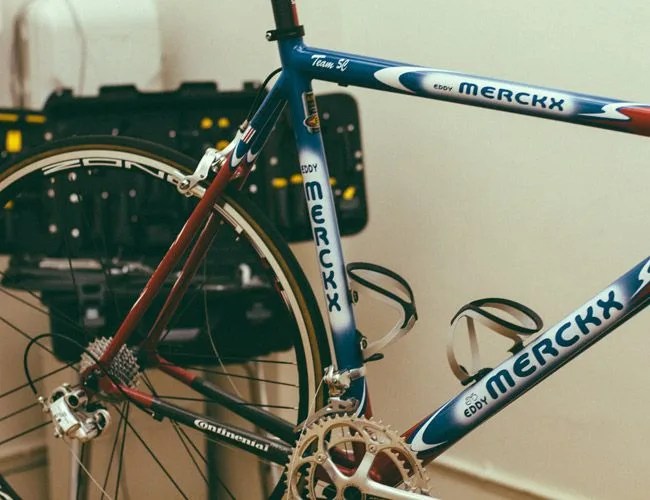
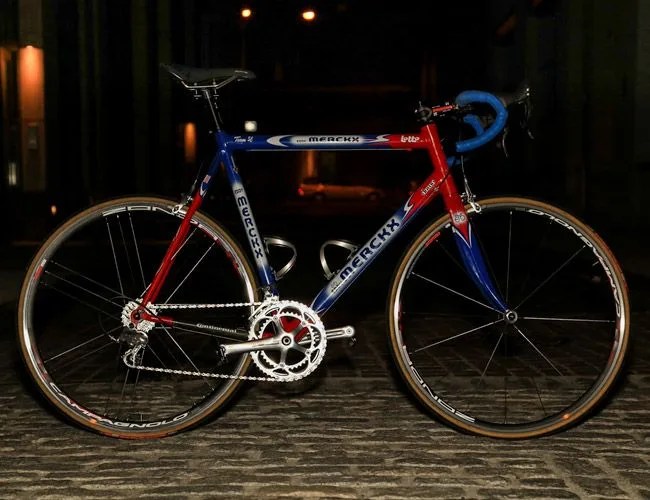
The first order of business was to pick out a frame. The choice was easier than you’d think given the cost restrictions. I’ve ridden carbon fiber frames for the past six years, spending more money than I’d like on composite frames that purportedly are both lighter and more comfortable than aluminum. However, the difference between high-end aluminum or steel and mid-grade carbon (which are often around the same price) is not nearly as vast as some marketing departments would like you to believe. With limited funds, a new high-end carbon fiber frame was out of reach, and used carbon can be rather dodgy: the material can fail suddenly and dramatically, so unless you’re sure of the frame’s history it’s best to look elsewhere. The final requirement was that the frame had to have been made in roughly the last decade so there wouldn’t be any compatibility issues with modern components. That left me looking at flagship aluminum frames from 2002-2005 (the last years aluminum was used in the pro ranks). As soon as I knew it had to be aluminum, I knew it had to be a Merckx Team SC.

It wasn’t too much trouble to set up a bike stand at Gear Patrol HQ, put on some Creedence Clearwater Revival, open up a refreshing carbonated beverage and get to work.

The Team SC was the coolest pro bike from the era when I really fell in love with cycling. While Lance Armstrong was busy capturing wins at the Tour de France on a Trek, guys like Johan Museeuw, Richard Virenque and Peter Van Petegem were capturing my heart with gutsy attacks and huge wins. All of these guys rode for the Lotto Farm Frites (yeah, thats a French fry company) team that later became Lotto Domo. They rode the Team SC to wins at the hellish Paris-Roubaix and on top of the insane Mont Ventoux. Lance was cool, but the Lotto Domo guys were the ones you wanted to root for; these guys had panache. Couple the Lotto mystique with the fact that the Team SC was actually a pretty excellent bike and I was obsessed. I’ve dreamed of owning a Team SC for 10 years, so I figured it was fate when I found a mint Team Lotto Domo frame for $450 on eBay (never mind if it was a little too big).

Step 2: The Components

The Legend of Lotto and the Team SC
Petegem

Bike-Build-Gear-Patrol-sidebar-1

Peter Van Petegem was a spring classics machine who managed to win both Paris-Roubaix and the Tour of Flanders in 2003 (one of only 10 men to win both in the same season).

Virenque

Bike-Build-Gear-Patrol-sidebar-3

Richard Virenque won a grueling stage that finished atop the moonscape of Mont Ventoux in 2002.

McEwen

Bike-Build-Gear-Patrol-sidebar-5

Robbie McEwen won pretty much every sprint stage and points classification from 2002-2006 and though he couldn’t get anywhere near a mountain victory he was always entertaining at the finish line.

After the frame was sorted the rest of the bike took shape pretty quickly. I wanted the bike to look like it did when it was raced 10 years ago, so component choice was actually pretty easy. The Lotto Domo bikes were outfitted with gleaming, top-of-the-line aluminum Campagnolo Record that had little bits of (then revolutionary) carbon fiber throughout. These days, Campagnolo Record is made almost entirely out of carbon but they do still make a high-quality polished aluminum group set called Athena. As an added bonus, Athena is significantly cheaper than their highest end groups and it still has the latest 11-speed tech. For those wondering why I didn’t pick SRAM Force or Shimano Ultegra, which are both incredibly capable groups, know that my choice was 90% aesthetics (trying to create my childhood dream bike) and 10% ergonomics (I like the way Campagnolo feels while riding). Since Campagnolo Athena 11 ticked all the performance, price, and aesthetic boxes I bought (almost) an entire group from online retailer wiggle.com for $920.

A worthwhile rule of thumb is the more moving parts a component has, the more sense an upgrade makes. One of the most obvious places is the shifters, with their complicated system of pulleys, cogs and ratchets. I substituted in top-tier Record shifters for the performance benefits and to keep in line with the aesthetics of the build. Since I had already bought Italian components in Campagnolo, it only seemed right to finish off the build the same way. I added a stem, seatpost, and handlebars from Italian company 3T, which to my mind makes the best of all these for the money. Add to that a saddle by fellow Italians Fizik and I had exactly $415 left of my original $2,000 budget for the final pieces — wheels and tires. A pair of Campagnolo Zonda wheels for $410 and a spare set of tires I found in my garage sealed the deal. I had all the components. Now I just needed to make them into a bike.

Step 3: The Build

There are a couple of ways to go about building a bike from the frame up: either you can pay a shop somewhere in the neighborhood of $200 to build it up flawlessly while you sit at home and play MarioKart, or you can build it yourself. I decided on the latter.

bike-build-build-gear-patrol

Because road bikes are relatively simple machines they’re not too hard to build yourself if you’re so inclined. However, some sort of guidebook is an absolute must until you know what you’re doing. I recommend either Lennard Zinn’s book on road bike maintenance or Park Tools Big Blue Book to guide you along the way. (Check out roundup of bike maintenance books for more options.) A tool kit can end up being a considerable investment, and there are times when it will make economic sense to take your bike to a shop. Luckily for me and my wallet, I spent a considerable portion of my teens working as a bike shop mechanic, so it wasn’t too much trouble to set up a bike stand at Gear Patrol HQ, put on some Creedence Clearwater Revival (the only music I ever hear at bike shops), open up a refreshing carbonated beverage and get to work.

With new components and a well-made frame, everything tends to go together quite nicely. Issues were few and far between. The only major time-consumer was installing the shift and brake cables, which took a bit of trial and error. That being said, I’d only recommend doing the build yourself if you’ve done some involved bike maintenance beforehand or are the kind of person that enjoys putting Ikea furniture together. At the end of the day, you’re going to be the one riding it. Do you trust yourself?

If you might be interested in building a bike in the future, it’s worthwhile to escalate your maintenance work beforehand so you’ll be familiar with the bike and how each component works. Go from fixing your own flat tires to removing and cleaning your chain and cassette to changing your cables, and by the end you’ll have a good enough working knowledge (and a reasonable supply of tools) to build a bike with the assistance of a book or the web. However, if this all sounds like a bit much, it might not be a bad idea to patronize your local shop; although the $200 labor ticket might seem steep, keep in mind all the savings you’ve already enjoyed by buying online.

Step 4: The Sense of Accomplishment

Bike-Build-Final-Gear-Patrol

So there you have it, an example of how you can build a bike that’s pro level for just a hint less than $2,000. I’m absolutely smitten when I look across from my desk and see my gleaming red, white and blue beauty leaning against the wall. Sure, it’s 10 years old, and yeah it’s a little too big, but hell, I’m in love. I can’t imagine being this enthralled with a middle-of-the-range 2013 model that I rolled off the showroom floor. The wonder of a custom bike is not simply the end product but the process itself, something that’s so often missing from modern bike purchases. Because each component received so much consideration, thought and scrutiny, the Merckx has become much more than the sum of its parts. Here’s hoping I don’t wreck it.