How to Remove That Goofy Corporate Logo from a Sweet Patagonia Fleece

As the brand shifts away from the practice, you can extend the life of your snazzy freebie, bro.

patagonia fleeceDrew Angerer

Welcome to Product Support, a series devoted to helping you get the most out of your stuff.

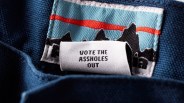
As you may have heard, Patagonia is moving away from the practice of adding corporate logos to its garments. Their reasoning is, such logos greatly decrease the lifespan of the product; after all, that technical fleece vest your company handed out at the annual retreat isn’t so sweet once you head home if it’s embroidered with goofy graphics. You don’t really wanna wear it (especially once you change jobs), and neither does anyone else — so it ends up next to 11.3 million tons of textiles in landfills (per a 2018 stat cited by Patagonia in its blog post on the policy change).

However, we have some good news. Patagonia also notes that “using a garment for just over two additional years, for example, cuts its overall footprint by 82 percent, and we build our gear to be used for decades.” With that in mind, you can keep that sweet piece of swag out of the landfill and keep rocking it for years to come, simply by removing that silly logo. Here’s how.

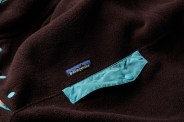
Step 1: Get a Seam Ripper

This handy sewing item is indispensable when it comes to removing stitches. Sure, there are hacks, but especially if you are new to this practice, the right tool for the job will make it much easier.

It’s also an incredibly affordable product: CampTek’s highly rated Seam Ripper and Thread Remover Kit features five different implements and costs less than 7 bucks. You can pick up a seam ripper at any fabric store — or probably around your parents’ house — too.

Step 2: Shred Those Threads

While removing threads from a more delicate garment like a polo or button-down can be a challenge and not look as good when you are done — especially if it’s light colored — fleece fabric is porous enough that you can remove threads without leaving much, if any, evidence of the crime.

All you’ll want to do is delicately slide the long, sharp end of the seam ripper under the logo threads but above the garment. Then push and lift to gently slice through them. You can do a few threads at a time, just take care to steer clear of the garment itself.

Step 3: Flip and Rip

Once you’ve sliced some threads, flip the fleece over to the other side and start pulling them out through the back. Depending how it has been embroidered, you can also do some seam ripping on the back side, which helps you avoid damaging the front of the fleece if you slip up.

Keep at it — flipping from front to back as necessary — until all the seams are cut, then gently pull them all out. Lingering residue? Remove with some masking tape or a lint roller to clean up your handiwork. If you stay focused and careful, you should be staring at brand-new, logo-free fleece you can wear for years to come.

Don’t believe us? Just watch this bro up the resell value of a Raiders jacket by lifting the name embroidered on the left chest.

https://www.youtube.com/watch
, , ,