Grilling Basics from The Meat Hook Butcher Shop

Whether you have a cheaper grill or a top-dollar wood-fired jam, one thing should be made clear: grills don’t cook steaks by themselves.

the-meat-hook-gear-patrol-lead-full Michael Harlan Turkell

Editor’s Note: We order meat online, snack on artisanal jerky and braise briskets the size of torsos. But if we’re meat freaks, Tom Mylan, owner of The Meat Hook butcher shop in Brooklyn, NY, is a like a beef cardinal. This grilling primer was excerpted from The Meat Hook Meat Book. (If you want more grilling tips, check them out here.

Using a Grill

Whether you have a cheaper grill or a top-dollar wood-fired jam, one thing should be made clear: grills don’t cook steaks by themselves. How you set up your fire is more important than what kind of fuel you use or the kind of grill you have. You can buy a fancy $5,000 grill, load it up with the most costly Japanese cult charcoal you can find, and completely ruin a lot of expensive meat because you have no idea how to build your fire.

Fire

OK, so let’s go Boy Scout here and talk about building the fire. First, assess your grilling needs: what are you cooking on the grill, and in what order is the food going to be served? Let’s say that you’re doing a fairly normal weekend party menu with grilled veggies, steaks, chicken, and sausages.

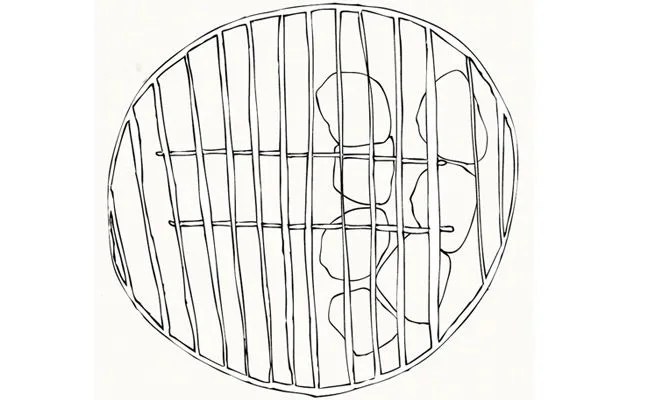
Well, you now know that you’ll need two very different heat situations going on with the fire if you want all this stuff to come off the grill at around the same time. This means that you’re going to want to build a fire that looks like the one in the illustration below. Notice that most of the coals or wood chunks are on one side, with a small amount on the other side.

The two types of fire will allow you to start your chicken and sausage on the high heat side of the grill to get some color on the meat and then move them to the lower-temperature side to cook slowly while you grill your veggies and steaks on the other side.

Or say that you are going straight Neanderthal and are only going to grill up a ton of steaks and chops. You’ll need a fire like this:

grill-layout-ambiance

Notice that this fire is structured so that there are no coals or wood on the left side, for a left-handed griller (obviously, reverse this if you’re right-handed).

I distinctly remember that my dad had a squirt gun shaped like a mini Uzi submachine gun that he used to try to control flare-ups in the rusty, beaten-down old gas grill that came with our apartment in Orange County, California. Not only did the Uzi do a bad job of quelling the flames of grease fires, it also added a good amount of steam to the mix, which contributed an unwanted flaccid texture to the meat being cooked. Luckily, there is a better way to tame the flames. Because of the fat that is going to be melting and dripping everywhere, you need a part of the grill with no flames under it; this is the place to park your steaks, chops, and chickens and wait it out while the grease burns off when the grill is engulfed in fat-fueled flames. By building a fire in just one side of the grill, you sidestep the whole grease-fire issue. When the flames die down, simply move the meat back to the heat. The grill section without fire is also a good place to let steaks rest before serving or to keep them warm while you whip up a salad, or to allow foods about to be added to the grill to warm up so that they will cook more evenly.

the-meat-hook-gear-patrol-ambiance

Theory

Grilling, like all cooking, is the simple act of choosing when, where, and how much heat you will apply to the item you want to stuff in your mouth in a way that yields optimal results.

When you’re using a grill, though, things can get a bit more complicated. You’ll need to choose (wisely) the type of fuel you’re going to burn to achieve the desired results, determine how you are going to structure your fire to give you a range of heat intensity, and manage any flames caused by rendered fat.

A good general strategy for thicker cuts and items like half chickens is to start them off hot, get an acceptable amount of char on them, and then move them to a lower-temperature area to finish. This also works really well if you have guests coming over who don’t tend to be punctual when it comes to dinnertime. You can sear your larger items ahead and finish them later, or rewarm said items if some of your buddies roll in after half your friends have already gone home.

However, this setup won’t work for quick-cooking thin items like skirt steaks or Korean-style short ribs. For meats that need to take on a char quickly and then get off the grill before they’re overcooked, you need extremely high heat. With charcoal or wood grills, you must build one section of your fire closer to the grill grate than the rest of it and plan the arc of your grilling so that these items go on early, when the coals are at their hottest. For gas, you should crank up all your burners to the maximum, close the lid, and walk away from the grill for 20 minutes or more before you open it up again—and only open it when you’re ready to throw your thin meats on.